From Fruit to Liquid Gold: Your DIY Olive Oil Journey Starts Here
Olive oil isn’t just a kitchen essential—it’s a symbol of culture, tradition, and wellness. Known for its rich, peppery flavor and powerful health benefits, this golden elixir has been around for thousands of years. But have you ever thought about making your own?
Believe it or not, you can make homemade olive oil right in your kitchen. No industrial machines. No high-tech gear. Just some basic tools, fresh olives, and a little patience. Whether you’re doing it for fun, flavor, or just to say, “I made this,” here’s exactly how to do it—step by step.
What You’ll Need to Get Started
Before we get messy, let’s make sure you’ve got everything ready. You don’t need a lot, but the right tools make all the difference.
- Fresh olives (the more, the better!)
- Manual meat grinder (or a food processor as backup)
- Skillet or pan (nonstick or stainless steel is fine)
- Fine mesh strainer
- Cheesecloth or a clean thin fabric
- A large bowl
- A storage bottle or jar
That’s it! No fancy oil press required.
Step 1: Prep the Olives
Freshness matters—big time. Use plump, ripe olives that haven’t been sitting around for days. Wash them thoroughly, and then remove the pits. This part’s a little tedious, but necessary. You can cut around the pits by hand or use an olive pitter if you’ve got one handy.
Pit-free olives are easier to grind and kinder to your equipment.
Step 2: Create the Olive Paste
Next, toss the pitted olives into your manual meat grinder and start cranking. You’re aiming for a thick, chunky paste, kind of like tapenade but rougher.
No grinder? No problem. A food processor will do the trick, though the texture may be a little less traditional. The important part is to break down the olive flesh enough to release the oil trapped inside.
Step 3: Warm the Paste Gently
Now comes the transformation. Scoop your olive paste into a skillet and warm it over low heat. Don’t fry it—just warm it enough to coax the oil from the fruit. Stir slowly and consistently for about 5 to 10 minutes.
This step helps loosen the oil, making extraction easier. Too hot, and you risk cooking off the flavor. Keep it gentle and slow.
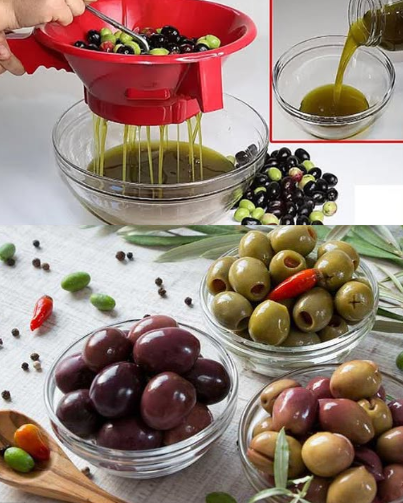
Step 4: Press and Strain the Oil
Time to separate the oil from the pulp.
Place a fine mesh strainer over your bowl and line it with cheesecloth (or another thin, clean cloth). Pour in your warm olive paste and let it start to drip naturally.
To speed things up, use your hands (wear gloves if you like) or a clean heavy object to gently press the paste. You’ll notice a mix of oil and liquid beginning to collect in the bowl.
Video : How to Make Olive Oil at Home
Step 5: Separate the Oil
What you’ll have now is a cloudy liquid containing both olive oil and water. Let it sit undisturbed for 30 minutes to an hour. The oil will rise to the top—nature’s way of doing the sorting for you.
Once it settles, carefully skim the oil off the top with a spoon, or use a turkey baster or pipette to suck it up and transfer it into a clean container.
Step 6: Bottle It and Store It Right
Pour your freshly made olive oil into a glass jar or bottle with a tight-fitting lid. Make sure it’s clean and dry before bottling to prevent spoilage.
Store your olive oil in a cool, dark place—a pantry or cupboard works great. Exposure to light and heat can degrade its flavor, so keep it tucked away.
Pro Tips for Flavorful Success
Want the best-tasting, longest-lasting oil? Here’s how to make your batch even better:
- Start with high-quality, fresh olives. Bruised or moldy fruit will affect flavor.
- Make small batches. Homemade olive oil doesn’t have preservatives, so it’s best used within 2–3 weeks.
- Clean everything thoroughly. Even small traces of old food or moisture can cause spoilage.
- Try different olive varieties. Some are buttery, others are peppery—find your favorite!
Why Make Olive Oil at Home?
You might be wondering, “Why go through all this trouble when I can buy a bottle at the store?” Good question. Here’s why it’s worth it:
- Unmatched freshness – Nothing beats the flavor of just-extracted olive oil.
- Total control – You choose the olives, the process, and the outcome.
- Hands-on learning – You’ll understand the craft and chemistry of real olive oil.
- Fun and rewarding – Honestly, it just feels good to say, “I made this.”
Plus, if you love DIY food projects, this one’s a winner.
A Few Words of Caution
This method is perfect for small-scale home use—not industrial production. You won’t get liters of oil, but you will get a deeper appreciation for what goes into every golden drop.
And because homemade oil doesn’t have the same filtration or preservation as store-bought, it’s best to use it up quickly and keep it refrigerated if you’re not consuming it within a few days.
Video : How to make olive oil without special tools
Conclusion: Turn Fresh Olives Into Liquid Gold
Making olive oil at home isn’t about perfection—it’s about experience. It’s about getting your hands a little messy, slowing down, and appreciating the beautiful transformation from fruit to fat. It’s a reminder that some of life’s best flavors come from simplicity and effort.
So next time you see fresh olives at the market—or on a tree—grab a bunch and give this a shot. With a little time and a lot of love, you’ll be pouring fresh, fragrant olive oil that you made with your own two hands.
And trust me, once you taste it, you’ll never look at store-bought bottles the same way again. 🫒💛