Who knew that a crunchy snack from the pantry could become your next garden project? That’s right—growing peanuts from store-bought raw nuts isn’t just possible, it’s downright rewarding. If you’ve got a sunny spot, a little patience, and the right know-how, you can cultivate your very own peanut harvest right at home.
Let’s dive into how you can turn store-bought nuts into a thriving backyard peanut crop—step by step, root to roast.
Choose the Right Peanuts to Start With
This part’s easy, but it’s crucial. You can’t just grab any old peanut and expect it to sprout.
Go for raw, unsalted, and unroasted peanuts still in their shells. These are your best bet because the germ—the part that sprouts—is still alive and kicking. Roasted or salted peanuts have been cooked and processed, which means they’re dead weight in the garden.
So next time you’re in the store, skip the snack aisle and check the bulk bins or international markets for raw, shell-on peanuts.
Get a Head Start Indoors if You Live in Cooler Climates
Peanuts are warm-weather crops. They need at least 100 to 130 frost-free days, which is why southern growers have an easier time. But if you’re up north, don’t worry—you can still get ahead.
Start seeds 5 to 8 weeks before your last frost date by planting peanuts indoors. Use biodegradable pots so you can transplant without disturbing their sensitive roots later on.
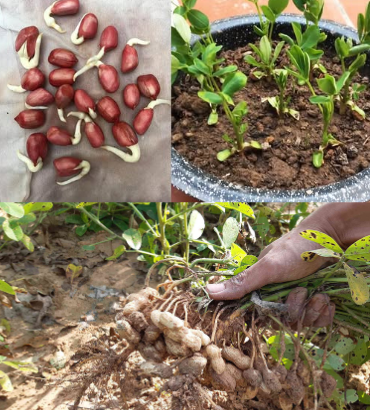
To plant, gently crack the shell open without damaging the seed. Then, press the seed 1–2 inches deep into light, loose soil and keep it warm and moist. Sunshine is your new best friend here—peanuts need full sun to thrive.
Create the Perfect Soil and Spacing for Strong Plants
Peanuts don’t like soggy feet. That’s why well-draining, sandy-loamy soil is your secret weapon. Add sand and aged compost to your garden beds if the soil is heavy or clay-based.
When planting outdoors:
- Space seeds 1 to 2 inches deep
- Keep 24–36 inches between seeds
- Space rows at least 72 inches apart
This setup gives the plants plenty of room to spread and develop their underground pods, which grow from stems called pegs that burrow into the soil after flowering.
Video : How to grow Peanuts in your home garden
Water and Mulch: Keep the Roots Happy
Peanuts like consistent moisture, but not wet feet. Water about 1 inch per week, more during hot, dry spells. The goal is steady, even moisture—avoid letting the soil dry out completely or stay waterlogged.
Once your seedlings are around 6 inches tall, it’s mulch time. A layer of straw, dried leaves, or grass clippings helps lock in moisture, keep weeds at bay, and protect delicate roots.
Fertilizer Needs Are Surprisingly Simple
Here’s the cool part: peanuts fix their own nitrogen thanks to a symbiotic relationship with soil bacteria. So unlike most garden plants, they don’t need a nitrogen boost.
Instead, focus on calcium, which is essential for pod formation. Work a low-nitrogen or balanced fertilizer into the soil before planting. Crushed eggshells or gypsum are great natural sources of calcium if you’re going organic.
Think of it like parenting a teenager: they don’t need more energy—they need structure and support.
Pruning and Propagation: Keep It Low-Maintenance
Good news—you don’t need to fuss too much here. Pruning isn’t usually required unless your plant is sprawling wildly or you’re tight on space. If you do prune, just tidy it up lightly and avoid cutting any stems that might peg into the soil.
As for propagation, peanuts are self-sustaining. Save healthy, mature seeds from this year’s crop to plant again next spring. Just dry them thoroughly and store them in a cool, dark place.
Harvest Time: The Fun (and Tasty) Part
About 100 to 150 days after planting, your peanut plants will start turning yellow—this is your sign that it’s harvest time.
Gently loosen the soil and pull up the entire plant. You’ll find the peanuts clinging to the roots like little treasures. Let the plant dry for a few days in a warm, shaded spot.
To store raw peanuts, keep them in a mesh bag or paper sack in a dry, well-ventilated area. Or, for a snack-ready treat, roast them in the oven and enjoy the fruits (or legumes) of your labor.
Why You Should Grow Your Own Peanuts
You don’t need a massive farm to grow peanuts—just a bit of sun, patience, and dirt under your nails. It’s a fun project for gardeners of all levels, and watching a common snack turn into a homegrown crop is oddly magical.
Not only do you get fresh, chemical-free peanuts, but you’ll also have a deeper appreciation for how food is grown. And let’s be honest—telling your friends you grew your own peanuts? That’s brag-worthy.
Video : Planting & Growing Peanuts – Easy How To
Conclusion
Growing peanuts from store-bought nuts is more than just a quirky gardening experiment—it’s a gateway to self-sufficiency, sustainability, and sweet roasted rewards. From choosing the right seeds to pulling up your harvest, every step is satisfying and surprisingly simple.
So the next time you crack open a raw peanut, don’t just eat it—plant it. With the right care and a little sunshine, you’ll have your own homegrown snack stash in no time.