Ever dreamed of growing your very own Pakistan mulberry tree? You know—the one with those long, juicy, candy-sweet berries that melt in your mouth? The good news is, you can grow it from seed. The trick? A little patience, a dash of care, and this tried-and-true method that gets results. Ready to roll up your sleeves and start planting? Let’s go!
Why Grow Pakistan Mulberry at Home?
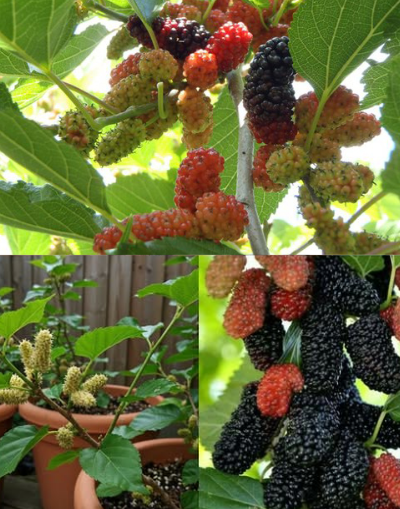
Before we get our hands dirty, let’s talk about why this particular mulberry variety is worth the effort. Pakistan mulberries (Morus macroura) are famous for their extra-long, soft, and sweet fruits—some up to 4 inches long! They’re a delight to eat fresh, toss into smoothies, or turn into jam.
Plus, the trees grow fast, adapt well to warm climates, and once established, they’re surprisingly low-maintenance. But growing them from seed? That takes a little know-how.
Step 1: Start with Ripe, Real Mulberries
This part’s important: Only use ripe mulberries from a true Pakistan mulberry tree, not a hybrid or wild mulberry. Look for berries that are deep purple or almost black—those are the ones packed with mature, viable seeds.
Once you’ve got your berries, gently mash them in a bowl to release the seeds from the fruit. It’ll look like a juicy mess, but you’re on the right track.
Step 2: Clean the Seeds Like a Pro
Here’s where the magic starts.
- Add the mashed berries to a bowl of water.
- Give it a good stir and let it sit for a few minutes.
- Good seeds will sink. Floaters (pulp and unviable seeds) get tossed.
Now, take those sinkers—your golden tickets—and rinse them thoroughly under clean running water. What you’ve got now are ready-for-action mulberry seeds.
Step 3: Chill Out with Cold Stratification
This next step is where many people get it wrong—or skip it entirely.
Why stratify? Because mulberry seeds naturally go dormant. Cold stratification mimics winter and tells them, “Hey, spring is coming—it’s time to grow!”
Here’s what to do:
- Mix your clean seeds with a bit of moist peat moss, sand, or even a damp paper towel.
- Drop that into a labeled zip-lock bag (yep, label it—you’ll forget otherwise).
- Pop it into the refrigerator (NOT the freezer) for 4 to 6 weeks.
That’s it. Just let nature work quietly in your fridge while you dream of juicy fruit.
Video : Guaranteed method to grow Pakistan mulberry from seeds
Step 4: Time to Germinate
After their chilly nap, it’s time to wake those seeds up.
- Grab small pots or seed trays and fill them with a well-draining potting mix. A good combo is compost, cocopeat, and either sand or perlite.
- Plant each seed about ½ cm deep—don’t bury them too far.
- Mist the top with water—just enough to moisten the surface.
- Cover the pot with plastic wrap or a humidity dome to keep things cozy and moist.
- Place the setup in a bright, warm area (around 68–77°F / 20–25°C), but skip direct sunlight for now.
Think of it like a mini greenhouse—it’s all about warmth, light, and moisture.
Step 5: Watch the Magic Unfold
Here comes the waiting game.
- Germination can take 2 to 6 weeks, sometimes even longer. Don’t worry—it’s normal.
- When you see tiny green shoots pop up, do a happy dance (optional but encouraged).
- Remove the plastic covering and place the seedlings where they’ll get indirect sunlight.
- Keep the soil lightly moist, never soggy. Too much water = rot city.
- Once they have 3–4 sets of true leaves, transplant them into larger pots.
At this stage, your baby mulberry trees are ready to grow up.
Final Growing Tips for Thriving Trees
Let’s make sure your mulberry journey ends in a tree full of fruit:
- Sunlight is key. Mulberries love full sun—at least 6 hours a day.
- Keep the soil well-drained and avoid heavy clay or waterlogged spots.
- Water moderately. Deep water once or twice a week is better than daily sprinkles.
- In the first year, prune and shape the young tree. This sets it up for better fruit production and structure.
- You might see fruit in just 2–3 years from seed, sometimes sooner with excellent care.
Imagine walking into your backyard, picking fresh berries off your own tree, and popping them straight into your mouth. It’s totally doable—and incredibly rewarding.
Video : Gamle Me Dher Sari Mulberry /Shahtoot Ugaiye ~ How To Grow Mulberry From Cutting ~2 Year’s Update
Conclusion: Your Pakistan Mulberry Success Starts Now
So there you have it—the complete, no-nonsense guide to growing Pakistan mulberries from seed. It’s not instant, but it is achievable. With a little prep, patience, and the right touch, you’ll have strong seedlings ready to become fruit-producing trees in no time.
Start with the right berries, clean and chill the seeds, give them the cozy germination setup they deserve, and nurture those sprouts into lush trees. Before you know it, you’ll be the proud grower of a Pakistan mulberry tree—and your taste buds will thank you every summer.
Ready to grow your own juicy legacy? Let’s get planting!