Growing your own food year-round sounds like a dream, right? But if you’ve ever tried to grow anything in the dead of winter or during unpredictable spring frosts, you know how frustrating it can be. Enter the walipini—also known as the underground or pit greenhouse. It’s not just some trendy homesteading idea; it’s an ancient, earth-smart technique that puts nature to work for you.
What Makes the Underground Greenhouse So Special?
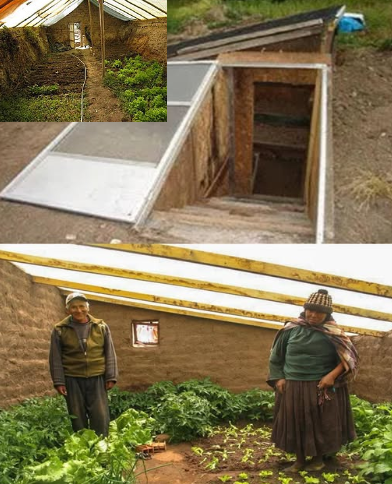
You might be wondering, “Why dig a hole when I could just build a regular greenhouse?” Great question. The magic of the walipini lies in its use of the Earth’s natural insulation. A few feet underground, the temperature stays surprisingly stable. That means fewer freeze warnings, less heating, and more peace of mind for your plants—and you.
- Thermal Consistency All Year
Think of the ground like a cozy blanket for your plants. While temperatures above might swing wildly, underground it stays mellow and mild. - Weather Shield
Heavy winds, hailstorms, snow? Your underground greenhouse barely flinches. It’s tucked in, safe, and protected. - Grow When Others Can’t
Forget seasonal planting restrictions. The walipini gives you a longer growing window—even in the chill of winter. - Eco-Friendly and Efficient
With the Earth doing most of the thermal lifting, your energy bills take a breather. That’s good for you and the planet.
Picking the Perfect Spot for Your Walipini
Not every backyard is created equal, so choose your location wisely. This isn’t just about digging a hole—it’s about maximizing nature’s gifts.
- Let the Sunshine In
In the Northern Hemisphere, aim for a south-facing slope. That’ll catch the most light throughout the day. If you’re in the Southern Hemisphere, go north-facing instead. - Drainage Is Non-Negotiable
Nothing wrecks a greenhouse like soggy roots or standing water. If your spot collects water, raise the beds or build drainage trenches. - Keep It Close
Accessibility matters. You don’t want to trudge across your entire property in a snowstorm to harvest lettuce.
Building the Underground Greenhouse: Step by Step
Now let’s get our hands dirty—literally. Building a walipini isn’t complicated, but it does require planning, elbow grease, and attention to detail.
1. Dig Deep, But Not Too Deep
- Ideal Depth: Shoot for around 8 to 10 feet deep. This taps into the Earth’s thermal sweet spot while still letting in sunlight.
- Size It Right: A 10×20-foot space works great for most backyard setups, but feel free to scale it up if you’re feeling ambitious.
2. Construct Solid Walls
- Materials Matter: Use bricks, stones, concrete, or earthbags—whatever’s sturdy and accessible.
- Insulate Smart: The north-facing wall should be reinforced and insulated to trap heat. Straw bales, foam boards, or even earth mounds can work wonders.
Video : 2 Yr proof AFTER building THE ULTIMATE WALIPINI (the WALLI THAT REALLY WORKS! !)
3. Design the Roof with Purpose
- Let the Light Shine: Use UV-resistant plastic, clear polycarbonate panels, or glass. It needs to let in sunlight and resist weather.
- Slope It Right: A slanted roof encourages snow and rain to slide off rather than pool on top.
4. Think Flooring Function, Not Fancy
- Gravel Is Gold: It drains well, prevents mud, and keeps things neat.
- Keep It Natural: Some folks leave the soil as is. Others go for concrete. Choose based on your moisture needs and budget.
5. Master the Air Flow
- Let It Breathe: Add roof vents or side windows to release hot air on warm days.
- Double Doors: One at each end improves access and cross-ventilation. Trust me, you’ll thank yourself later.
Ongoing Care: Your Walipini Maintenance Routine
Like any living system, your underground greenhouse needs regular check-ins. But the payoff is huge—fresh produce in December? Yes, please.
- Keep Tabs on Temp and Humidity
Install a basic thermostat or thermometer. Small changes can make a big difference for tender greens and fruiting veggies. - Pest Patrol
The enclosed space can attract critters. Stay ahead with natural pest deterrents and regular inspections. - Water Wisely
It might be humid, but roots still need hydration. Watch out for overwatering, especially if drainage isn’t perfect.
Extra Tips That Make a Big Difference
Want to take your underground greenhouse from great to amazing? These small hacks pack a big punch.
- Thermal Mass Magic
Line the inside with barrels of water. They’ll absorb heat during the day and release it slowly at night, keeping temps steady. - Use Raised Beds
This prevents soggy roots and helps you maintain soil quality. Bonus: less bending while gardening! - Bounce the Light Around
Paint inner walls white or hang reflective materials. It helps distribute sunlight evenly, so no plant gets left in the dark.
Grow Smarter, Not Harder
You don’t need a tropical climate or a heated greenhouse to grow food year-round. With a walipini, the Earth literally has your back. It’s a perfect solution for off-grid living, sustainable farming, and backyard gardeners who want more from their space.
Sure, it takes some effort upfront—digging, building, tweaking—but what doesn’t? The reward? A thriving oasis even when there’s snow on the ground.
Video : Underground greenhouses offer more than just food
Conclusion: Your Backyard Can Feed You All Year Long
An underground greenhouse isn’t just a gardening trend—it’s a lifestyle shift. It’s about reconnecting with nature, working with the environment instead of fighting it, and enjoying fresh greens while the world outside freezes over. Whether you’re growing lettuce, tomatoes, or herbs, a walipini makes it possible—and practical.
So go ahead, start sketching your layout and planning your dig. Because once you go underground, you’ll never look at growing the same way again.